The new Water System in Unity 2022 LTS and 2023.1


Most high-end environments require an ocean, lake, river, or even just a pool at some point. There are many ways to emulate these with a few shaders, but building an entire physically based, coherently integrated system in the High Definition Render Pipeline (HDRP) has been a complex and time-consuming task.
Today, we spotlight the new Unity Water System, introduced for the first time in HDRP as part of the 2022.2 Tech Stream, with a focus on rendering. The upcoming 2023.1 Tech Stream extends the system’s feature set for better integration with worlds and gameplay.
Create an ocean, lake, river, or pool in a few clicks
It’s now easy for environment artists to create and configure water surfaces – such as oceans, lakes, rivers, and pools – that will be integrated with other world and gameplay elements, like boats or seasides.
The first step is to activate water in your project:
- Activate and configure water for each quality level (render pipeline assets for each quality level)
- Activate water in the frame settings of your camera(s)
- Activate water inside your scene with a Water Rendering volume override, which allows you to enable water rendering only when you need it depending on where your camera is
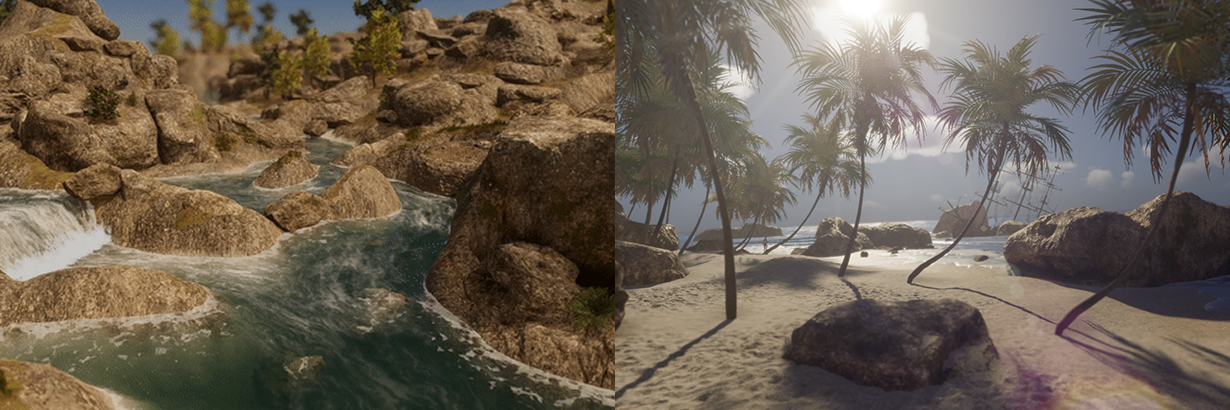
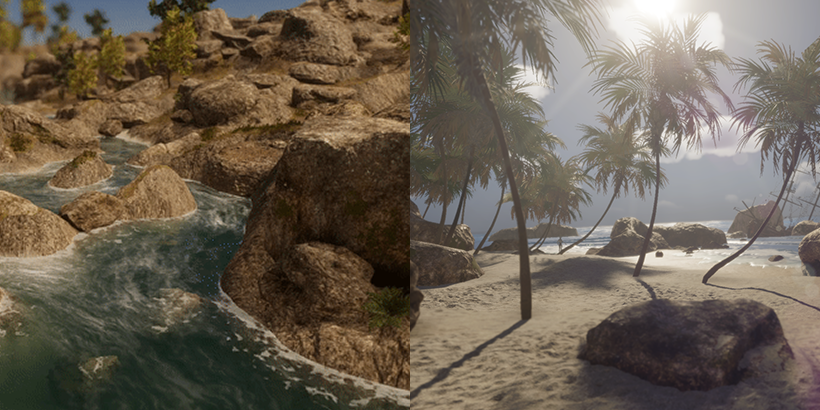
Once water is active, you are only a few clicks away from creating beautiful water bodies from the GameObject menu. HDRP provides three water surface types: pool, river, and ocean.
Quick start with water samples

Creating water bodies is fast, but the Water System provides many tools and options to customize and integrate water with your world and gameplay.
For a quick overview of all the systems and extensions in action, take a look at our water samples in the HDRP package (open Package Manager > select the High Definition Render Pipeline package in your assets > choose the water samples inside the Samples section).
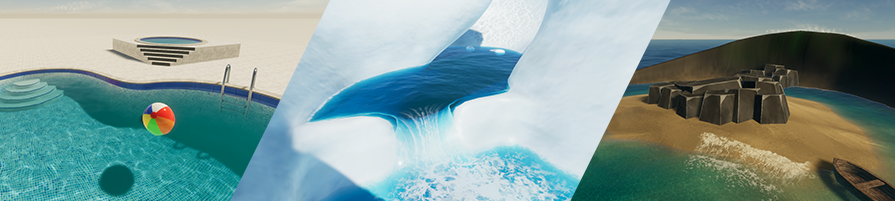
We provide four sample scenes.
The Swimming pool scene shows how to set up different “pools” in the same scene at different heights, as well as how to use custom meshes to render the surfaces with custom shapes.
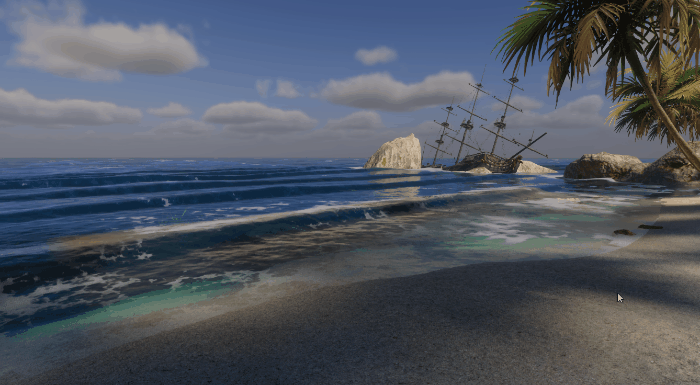
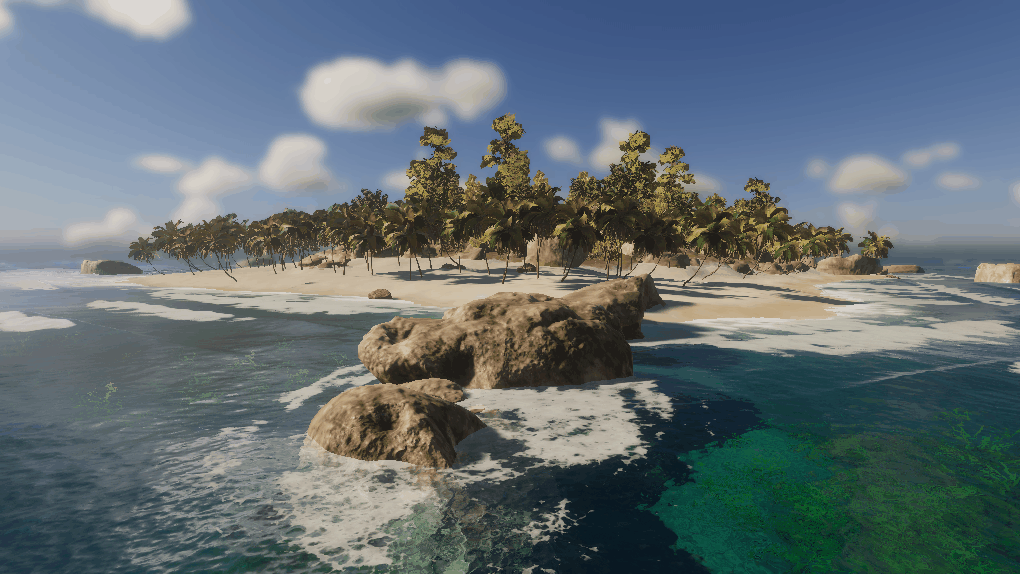
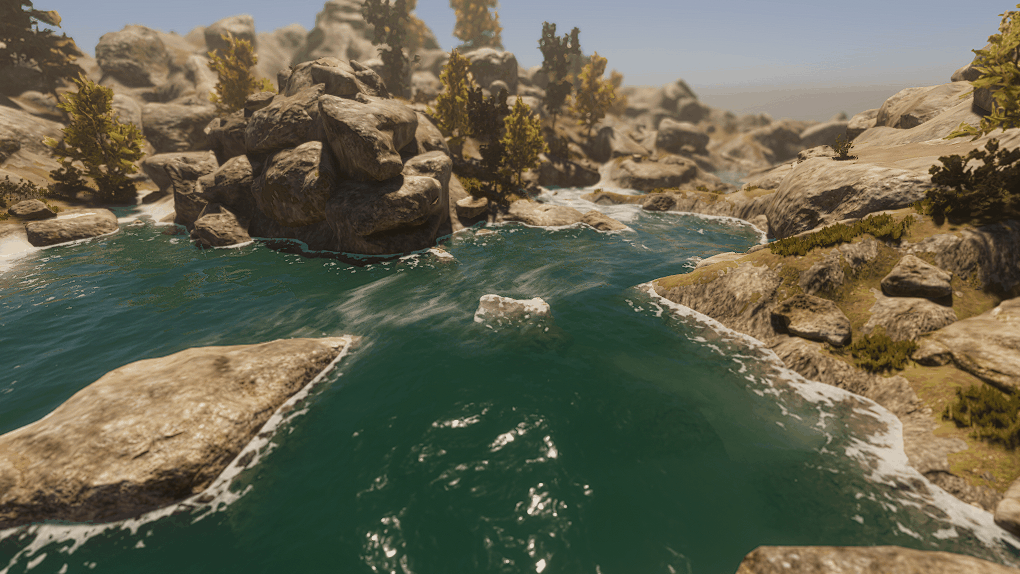
The Island scene showcases the ocean body and includes a water mask to remove swells around the island, a water deformer to create waves, decals to place foam on the beach, a foam generator to generate foam behind the waves and around the island, and a water excluder to exclude water from inside a boat. It also focuses on leveraging Burst with the water query API to parallelize the computation of multiple objects (i.e., seagulls) to float on water.
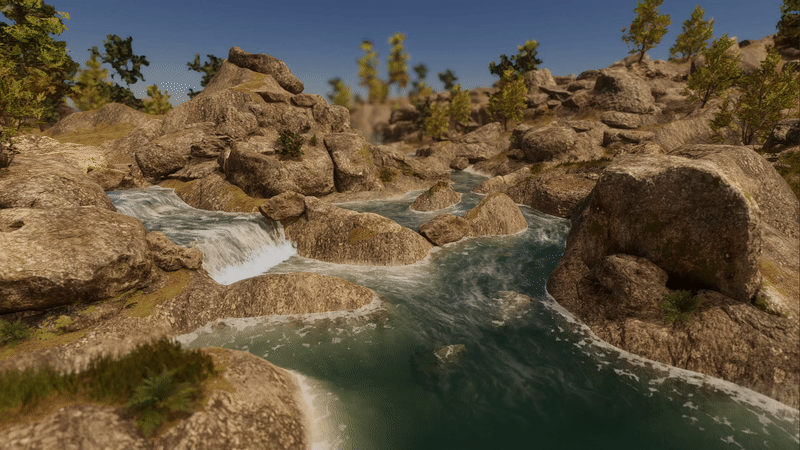
The Glacier scene showcases many features, including:
- River water body
- Water deformer to create a waterfall
- Current simulation to make the water flow through the glacier
- Water query API to make icebergs float down the river
- Foam generator to add foam behind icebergs
- Custom foam on the borders of the river and for the waterfall swirl using Shader Graph and the Water master node
- Decals to animate water falling in waterfall
- Sample caustics to project outside of water
The Water Line scene showcases the customization of the water’s surface level and underwater rendering using a custom pass, generating a larger blurry separation and simulating the effect of water on a camera lens.
Now that you’re fully briefed, let’s dive into each system.
Physically based water rendering
The Water System comes with an off-the-shelf, physically based water shader designed from a recently introduced lighting model in HDRP, also available for Shader Graph for customization. You can adjust the smoothness, refraction, absorption, diffusion, and light-scattering properties of a water surface.
The scattering color works like the base color of the water, so you need to start there to set up the general feel. Then you can change the absorption distance and refraction color, to control how transparent your water is and the tint applied to objects you see through water refraction. For a clean Caribbean Sea, you’d have a large absorption distance coupled with a cyan scattering and refraction color, whereas for a dirty river, you’d want a dark brown scattering color and a quasi-opaque river with a small absorption distance.
There are limitations to water rendering in 2022.2, some of which have been addressed in 2023.1 (seeing water behind Volumetric Clouds, precise waterline) or will be for 2023.2 (improved performance, support for rendering transparent surfaces overlapping water).
Let's dive
If you’re as fan, as we are, of Commandant Cousteau, you will enjoy diving under water with the Water System. It can detect when the camera is under the water plane and simulate underwater rendering according to the water’s physical properties.
Caustics can be generated procedurally to simulate the light refraction from the surfaces projected on the ground surface. Note that caustics can be reused as projections outside of water, using a decal, for example, to simulate water caustics reflected inside a cave.
When the camera sits between water and exterior, a water line is generated, and underwater rendering is composed on the submerged part of the camera. Water line rendering is improved in 2023.1, allowing you to customize it with a custom pass (see: The Water Line sample scene).
Swell, agitation, ripples, and currents
What makes water even more visually attractive is how it moves. Note that the provided water simulation system focuses on the water plane deformation and not on fluid or splash simulation.
Parametrization of the simulation
The waves are procedurally generated using a Fast Fourier Transform (FFT) simulation. Simply put, this works by summing a lot of simple waves of different frequencies to form complex waves. By controlling the range of frequencies, you can control the agitation of your water.
The system works by adding up varied ranges of frequencies, which we call bands.

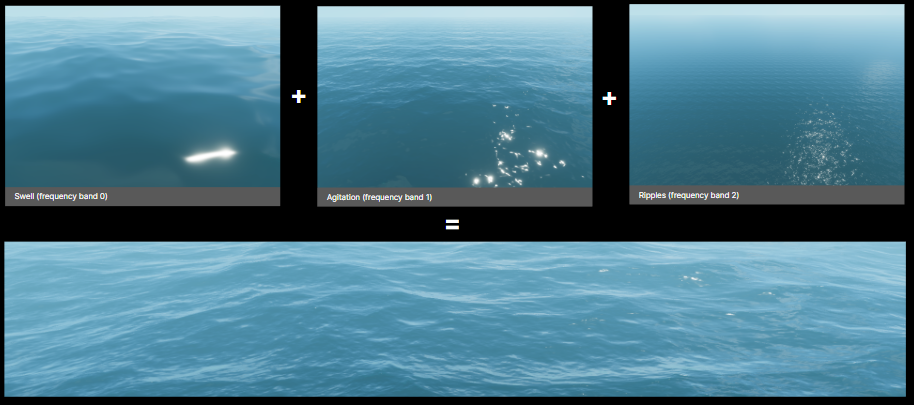
HDRP supports up to three bands, which simulates three effects of the real world on water and covers most use cases:
- The swell, representing the waves generated by the effects of the moon and the distant wind. It is solely controlled by the distance wind parameter and allows you to orient the swell's direction.
- Agitation, representing the chaos generated by the wind.
- Ripples, representing currents or local wind effects. This is the band with the highest frequencies, or smallest waves and adds fine detail to the water.

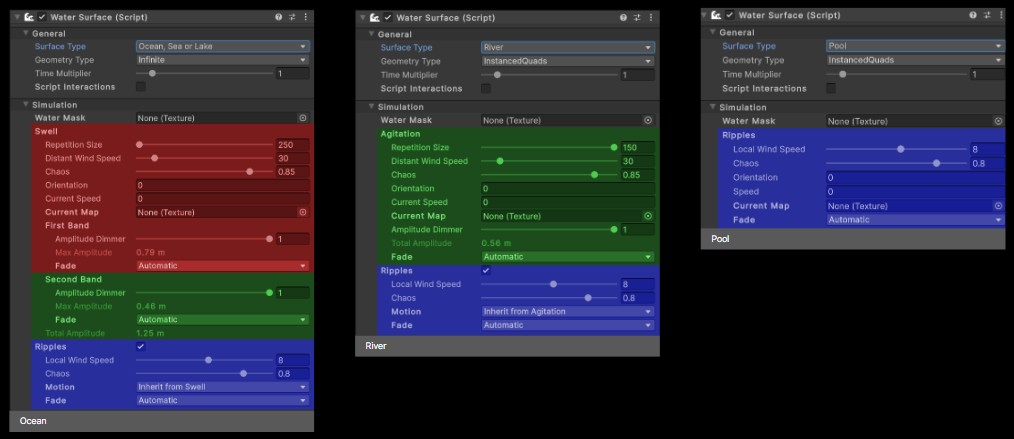
For example, since pools have small perturbations, they only use the highest frequency band: the ripples. A river, which is a bit more complex, will have ripples and an agitation band. And an ocean has the full frequency range to be able to cover all the various wave sizes we see in real life. The simulation is done on a square patch that is then repeated infinitely.
In 2023.1, we are adding support for currents that will make ripples flow according to flowmaps. The simulation is completely deterministic, so you can have consistent results when doing multiplayer games, physics simulations, or recording a short movie or a cinematic.
Rendering with precision and at scale
For rendering the water plane deformation, the system uses vertex displacement and can either apply to the provided procedurally generated geometry or to a custom mesh that you provide. The procedural geometry works by instantiating quads next to each other, similar to what terrain does for rendering. This can also be used when creating an infinite ocean or long rivers to make sure the vertex density adapts to where the camera is.
On top of that, in order to have finer vertex density to render small ripples, HDRP can rely on GPU Tessellation, which is a way to subdivide triangles using special shaders. With this capability, when the camera is at a certain range from the water surface, you can see that more triangles are generated close to the viewpoint.
The system also provides various options to balance between visual quality and rendering performance. Learn more about optimizing performance in our documentation.
Sampling the simulation
As we just explained, the simulation runs entirely on the GPU for efficiency, but some of it can be mirrored on the CPU to allow you to sample the water height and currents (for example, to make objects float along a river).
This has a high CPU cost since there are a lot of computations required for the simulation, but this is kept reasonable by using burstified jobs to more efficiently parallelize operations.
Note that, based on feedback, the scripting API has evolved between 2022.2 and 2023.1 and might require adjustments to your code between the two versions.
To get started, you can find two code samples in the water scenes: one in the Island scene, leveraging Burst to parallelize the sampling of many objects, and the other in the Glacier scene, showing how to make icebergs float along the currents of the river and fall down the cascade with simpler, non-parallelized code.
Foam
Foam simulates the bubbles generated on or under the water by the wind at crests, by waves breaking against the shore or rocks, or by a moving boat or character in the water.
The Water System can automatically generate foam based on the water body simulation and the distance wind speed for rivers and oceans. It then allows you to adjust the amount of foam and tweak the look, choosing its smoothness and the tiling of the texture.
For 2023.1, a Foam Generator was added to simulate white water for a boat trail, waves, or around rocks in open water, so that foam can be spawned and continue its own course according to the waves. In the sample scene, you will see different examples of usage for the Foam Generator: In the Island scene it’s used to generate foam at the top of the breaking waves and around the island, and in the Glacier scene to generate foam behind the icebergs floating down the river.
Using Shader Graph, you can inject custom foam to the Water master node and use it to add custom procedural foam for things like river borders or swirl down a waterfall. For example, in the Glacier sample, the swirl at the bottom of the waterfall is done by simply scrolling and blending a custom foam texture in Shader Graph. The foam on the borders is made by sampling the Depth Buffer to approximate depth.
Simulation foam will be injected where the agitation of the waves requires it. But for artistic purposes, you may want to mask out some regions from receiving foam using a foam mask.
Integration with worlds
To look more realistic, the water surfaces and simulations need to be modified locally to better integrate with your world and props. For example, to remove the water geometry inside a boat, add breaking waves near the shore on the seasides exposed to the swell, produce foam around rocks, modify local currents, shape calm areas inside bays, create a waterfall in the middle of a river, or generate small whirlpools in a river or a giant vortex in the middle of the ocean.
Multiple components allow you to customize the simulation, foam, and currents to create these local variations or more complex effects:
- The Water Mask allows you to attenuate or suppress ripples, swell, and foam on a specific portion of a water surface.
- Decals can be added on the water to create local foam, override the smoothness of the water, or simulate small local deformations such as droplets, impacts, or custom ripples by using a normal map. They can be also used to simulate wetness on the sand or rocks (see: the Island sample scene) or caustics on the walls (see: the Glacier sample scene) independently from the water system. Note that color cannot be changed since decals are only treated as grayscale.
- Water deformers can locally modify the simulation to create waves, as showcased in the Island sample, or a waterfall, as illustrated in the Glacier sample.
Performance and debugging
We measured the performance of the Glacier scene, where most of the features are activated on various consoles, and have profiled the Water System based on this. Through measuring, we learned that water rendering time takes approximately 4ms on the GPU on the latest generations, whereas previous generations’ consoles took around 7ms. This, of course, is highly dependent upon the quality settings of your water, the complexity of the simulation, and the amount of water pixels displayed on screen. But the system is performant enough to run smoothly on various platforms.
Furthermore, the system is using deferred clustered lighting to optimize shading and support a high number of light sources. Most of the rendering time is coming from the GBuffer pass due to the important number of vertices required to get nice waves, even in the distance. When enabling GPU tessellation on the surface, this cost can be controlled by changing the maximum tessellation level and the fade distance when the camera is far away from the water.
In the Miscellaneous section of each water surface, you have access to various debug modes to visualize current direction, deformation, foam, and other masks that are applied on the water.


Water demo
To see the Water System running on more complex scenes, we created a demo project showcasing pool, island, and river scenes.
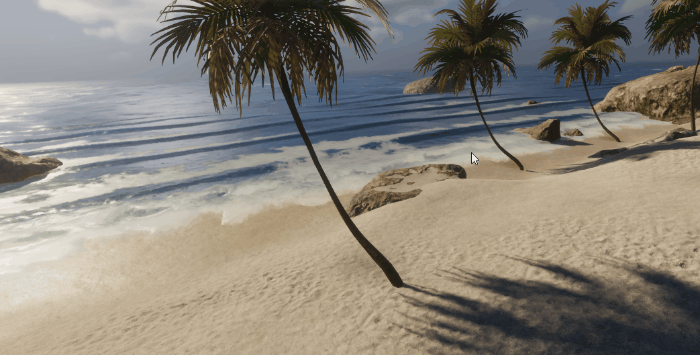
The Island scene showcases an infinite ocean with shore waves arriving on the beach. It shows how to use the water masks and make deformers and foam generators using custom render textures. It also uses decals to create complex interactions with the water surface when a wave approaches the beach.


The Pool scene showcases an indoor water surface with realistic color, depth, underwater, and caustics.
The River scene showcases the use of instanced quads and leverages a current map to simulate the flow, as well as decals, a custom Shader Graph, and VFX Graph to enhance the visuals.
You can download the demos on GitHub.
How to get started
To use the water system, you must be working with HDRP and Unity 2022.2 or above.
While you can use some of the initial functionalities in 2022.2, we recommend starting with 2023.1 where multiple improvements and features have been added, including some API changes.
You can download the water samples in the Package Manager, from which you can start reusing sample code and systems. Also, check out our WaterScenes demo project on GitHub for more complex examples of water systems integrating together.
To learn more, watch Rémi and Adrien’s Water System deep dive from GDC 2023 or read our documentation.
What’s next
We have yet to plan for any new features at this stage and are currently concentrating on stability. You can share your feedback with us or ask questions on our dedicated Unity forum thread.
To propose new features and vote for upcoming features under consideration, check out our public roadmaps.
Please share feedback on the new Water System in the HDRP forum. For future technical blogs from Unity developers, stay tuned to the ongoing Tech from the Trenches series.
Is this article helpful for you?
Thank you for your feedback!
- Unity Labs
- Copyright © 2024 Unity Technologies