#UnityTips: ParticleSystem Performance – Culling


In a previous post, I wrote about the performance considerations when using the various curve modes available in the particle system. This time, we will take a look into particle system culling.
TL;DR
- Culling is only possible when a system has predictable behaviour.
- Turning on a single module will not only add to that module’s overhead, but may increase the overall systems impact due to switching from procedural to non-procedural mode.
- Changing values via script will prevent culling.
- Using custom culling can provide a performance benefit, but only you the developer can decide if and when it is appropriate. Take into consideration the type of effect, if the player may notice it isn’t animating when invisible, and if it is possible to predict the area it will affect?
Procedural Mode
Internally, each particle system has 2 modes of operating, procedural and non-procedural.
In procedural mode it is possible to know the state of a particle system for any point in time (past and future) whereas a non-procedural system is unpredictable. This means that it is possible to quickly fast forward (and rewind) a procedural system to any point in time.
When a system goes out of the view of any camera, it becomes culled. When this occurs, a procedural system will halt updating. It will efficiently fast forward to the new point in time when the system becomes visible again. A non-procedural system cannot do this, it must continue updating the system even when invisible due to its unpredictable nature.
For example, the following system is predictable.It’s in local space, so the movement of the particle system’s transform does not matter; the particles are not influenced by any external forces such as collisions, triggers and wind. This means we are able to calculate the total bounds that particles will exist within during the lifetime of the system (yellow box) and can safely cull the system when not visible.

By changing the particle system to world space, it becomes unpredictable. When a particle is spawned it will need to sample the position of the transform at that moment. The position of the transform is unpredictable, its history and future are unknown.,Therefore, the system must continue to update itself even when invisible in order for the particles to be in the correct positions when it becomes visible again.
What breaks procedural mode, how do I know I have broken it?
When a particle system doesn’t support procedural mode, a small icon is displayed in the Inspector. Mousing over this icon will provide a tooltip that lists the reasons why the system no longer supports procedural mode and cannot be culled. It’s also possible to see that non-procedural mode is in use by looking at the bounding bound of the particle system, a continually changing bounds that only encapsulate the particles are a sign that procedural mode isn’t being used.

The following are examples of conditions that break support for procedural mode.
| Module | Property | What breaks it? |
| Simulation Space | World space | |
| Main | Gravity modifier | Using curves |
| Emission | Rate over distance | Any non zero value |
| External forces | enabled | true |
| Clamp velocity | enabled | true |
| Rotation by speed | enabled | true |
| Collision | enabled | true |
| Trigger | enabled | true |
| Sub Emitters | enabled | true |
| Noise | enabled | true |
| Trails | enabled | true |
| Rotation by lifetime | Angular Velocity | if using a curve and the curve does not support procedural* |
| Velocity over lifetime | X, Y, Z | If using a curve and the curve does not support procedural* |
| Force over lifetime | X, Y, Z | If using a curve and the curve does not support procedural* |
| Force over lifetime | Randomise | enabled |
*A curve can not support procedural mode if it has more than 8 segments. A segment is the number of keys plus an additional key if the curve does not start at 0.0 and another if does not end at 1.0.
Invalidating procedural mode in the player
Procedural mode is based on knowing exactly how the system will behave at a specified point in time with no external influences. If a value is changed via script or in the editor during play mode then those assumptions can’t be made and procedural mode is invalidated. This means that even though a system is using all procedurally safe settings, it’s no longer possible to use procedural mode and the system will not be culled anymore.
Changing a value or Emitting via script will invalidate procedural mode, which you can notice by examining the bounds of the system in the scene. If the bounds are continuously changing then the procedural mode is no longer being used.
Sometimes this can be avoided by using the particle system’s built in features to change properties, instead of using a script.
Calling Play on a system that has been stopped will reset the system and re-validate procedural mode.
Performance example
The performance difference between a procedural and a non-procedural system can be significant. This difference is most noticeable when a system is offscreen. In a scene containing 120 default systems, each simulating 1000 particles, the following performance difference is shown between local space (procedural) and world space (non-procedural). The left area shows the performance when not culled, and the right shows when culled.


Custom Culling
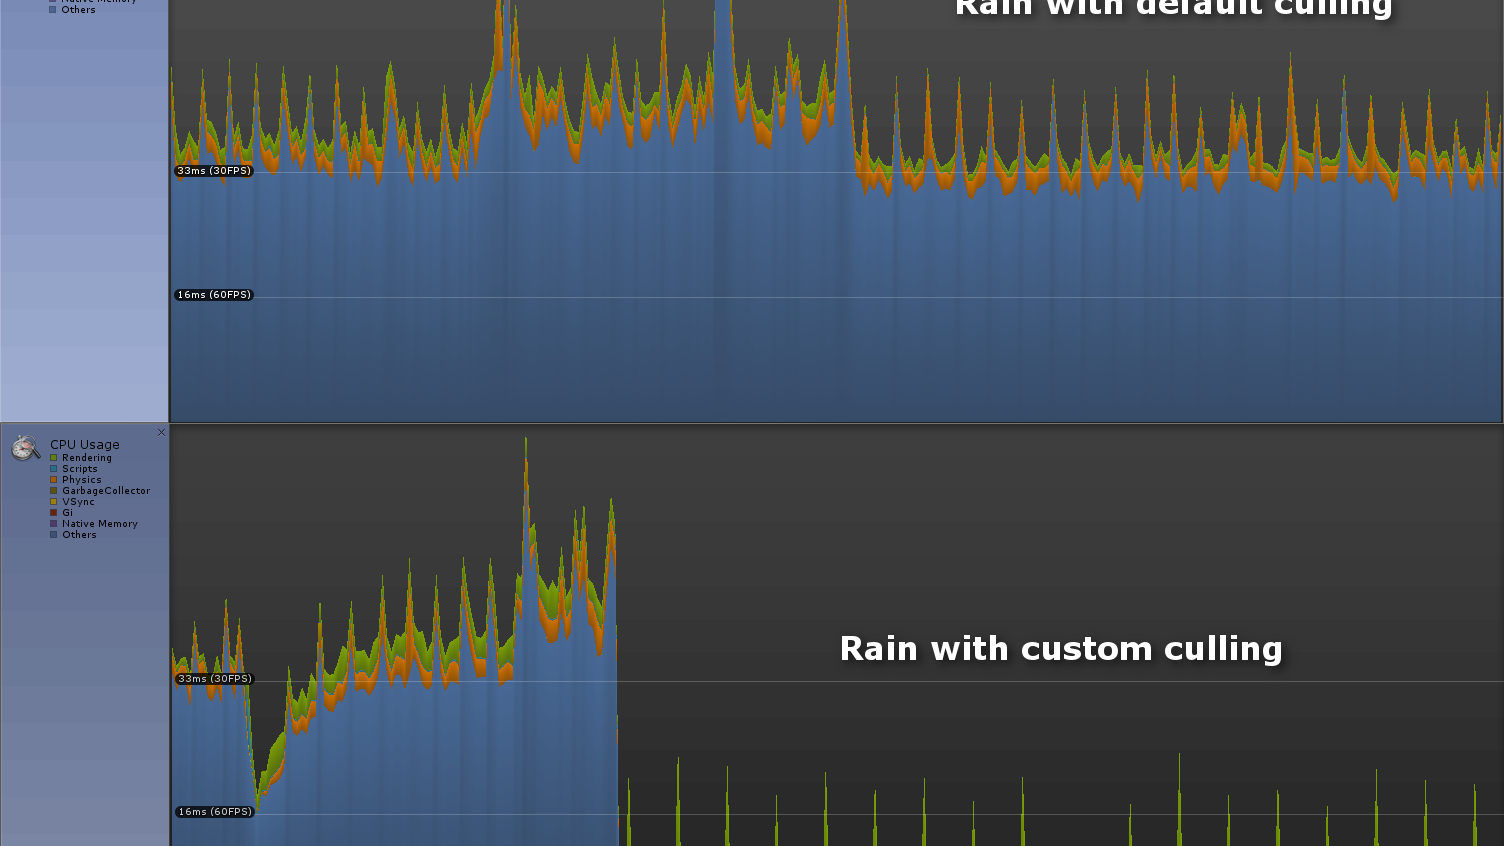
The following example shows a simple 2D rain effect that uses the collision module (breaking procedural mode).
By using the collision module the system is now unpredictable; colliders could be moved or have their properties changed throughout the life of the system. This means that predicting where particles will be in the future is impossible, and therefore the system must continue to update whilst culled.

We can see that the collision effect is localised within an area and we will not be moving the transform throughout the life; the particle system has no way to know this though.
It is safe for an effect like this to not be updated whilst invisible; it could benefit from custom culling.
The CullingGroup can be used to integrate into Unity’s culling system, using it we can create a culling area using bounding spheres. When the spheres go in and out of visibility a notification is sent; we can use this to pause the particle system when it is not visible and resume it when it becomes visible again. One downside is that off-screen particles will appear motionless, which can be noticeable in some effects. It's possible to hide this issue by simulating the system forward a little so as to give the illusion that the system was still active whilst not visible.
using UnityEngine;

public class CustomParticleCulling : MonoBehaviour
{
    public float cullingRadius = 10;
    public ParticleSystem target;

    CullingGroup m_CullingGroup;
    Renderer[] m_ParticleRenderers;

    void OnEnable()
    {
        if(m_ParticleRenderers == null)
            m_ParticleRenderers = target.GetComponentsInChildren<Renderer>();

        if (m_CullingGroup == null)
        {
            m_CullingGroup = new CullingGroup();
            m_CullingGroup.targetCamera = Camera.main;
            m_CullingGroup.SetBoundingSpheres(new[] { new BoundingSphere(transform.position, cullingRadius) });
            m_CullingGroup.SetBoundingSphereCount(1);
            m_CullingGroup.onStateChanged += OnStateChanged;

            // We need to start in a culled state
            Cull(m_CullingGroup.IsVisible(0));
        }

        m_CullingGroup.enabled = true;
    }

    void OnDisable()
    {
        if(m_CullingGroup != null)
            m_CullingGroup.enabled = false;

        target.Play(true);
        SetRenderers(true);
    }

    void OnDestroy()
    {
        if (m_CullingGroup != null)
            m_CullingGroup.Dispose();
    }

    void OnStateChanged(CullingGroupEvent sphere)
    {
        Cull(sphere.isVisible);
    }

    void Cull(bool visible)
    {
        if(visible)
        {
            // We could simulate forward a little here to hide that the system was not updated off-screen.
            target.Play(true);
            SetRenderers(true);

        }
        else
        {
            target.Pause(true);
            SetRenderers(false);
        }
    }

    void SetRenderers(bool enable)
    {
        // We also need to disable the renderer to prevent drawing the particles, such as when occlusion occurs.
        foreach (var particleRenderer in m_ParticleRenderers)
        {
            particleRenderer.enabled = enable;
        }
    }

    void OnDrawGizmos()
    {
        if (enabled)
        {
            // Draw gizmos to show the culling sphere.
            Color col = Color.yellow;
            if (m_CullingGroup != null && !m_CullingGroup.IsVisible(0))
                col = Color.gray;

            Gizmos.color = col;
            Gizmos.DrawWireSphere(transform.position, cullingRadius);
        }
    }
}


Not all effects are suited to custom culling. The system on the left is custom culled and can be seen to clearly go out of sync whilst the system on the right isn’t culled. This illustrates why non-procedural systems must be updated when not visible.
Is this article helpful for you?
Thank you for your feedback!
- Unity Labs
- Copyright © 2024 Unity Technologies