Having fun with the new Mecanim features


Hi! A couple of months ago, I wrote a post about the new features we’ve added in Mecanim for Unity 5.0. Today I want to show you some of the cool – and simple - stuff that you can do with our new features.
Random Nodes
Creating random “selector” nodes using StateMachineBehaviours in conjunction with the StateMachine entry node is really easy.
The first thing you want to do is to add transitions from the Entry node to your states.

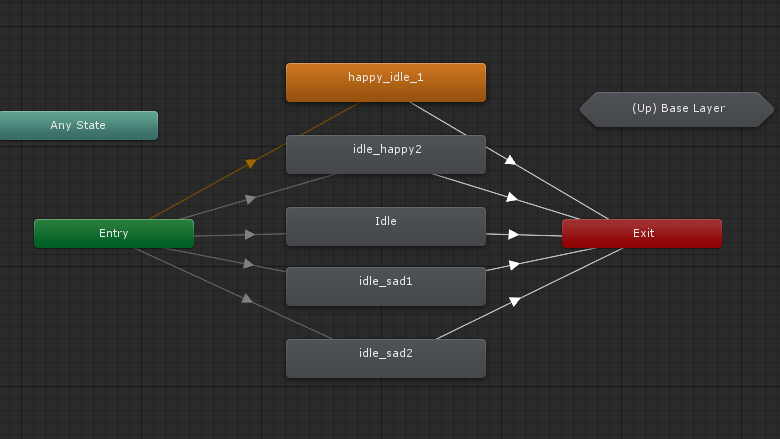
You will then need to assign each of those transitions an int condition.

Then you add a StateMachineBehaviour on your Idle StateMachine and implement OnStateMachineEnter like this:
override public void OnStateMachineEnter(Animator animator, int stateMachinePathHash)</pre>
{

animator.SetInt(“IdleIndex”, Random.Range(0, 4));

}
So now, every time you will enter the Idle StateMachine, a random State will be played.
Procedural States
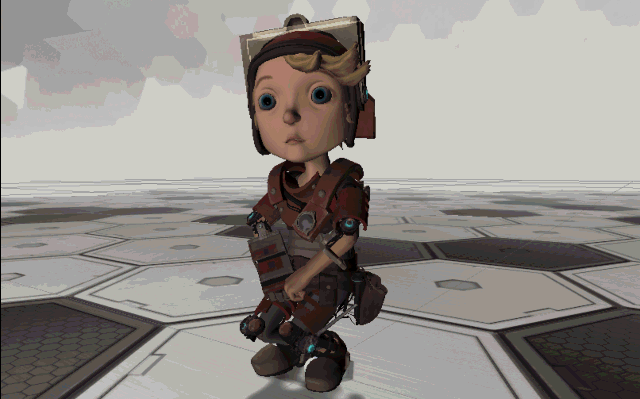
In 5.0 we also did some improvements to our Humanoid IK solver and added what we call IKHints. This means that you will now have control on your IK chain roll! Using the StateMachineBehaviour’s OnStateIK callback you can have IK setups that are specific to your states. You can even go crazy and have fully procedural states. The following code will make your character dance!
{

// Do a sine based on the State normalized time

float normalizedTime = (1.0f + Mathf.Sin(Mathf.Repeat(stateInfo.normalizedTime, 1.0f) * Mathf.PI * 4)) * 0.5f;

// lower the body

animator.bodyPosition = animator.bodyPosition + new Vector3(0, -0.3f, 0);

// make hands move left and right based on sine

Vector3 leftHandPosition = animator.bodyPosition + new Vector3(-0.1f + normalizedTime * -0.2f, 0, 0.2f);

Vector3 rightHandPosition = animator.bodyPosition + new Vector3(0.1f + normalizedTime * 0.2f, 0, 0.2f);

// put elbow up

Vector3 leftElbowPosition = animator.bodyPosition + new Vector3(-5, 2, 0);

Vector3 rightElbowPosition = animator.bodyPosition + new Vector3(5, 2, 0);

animator.SetIKPosition(AvatarIKGoal.LeftHand, leftHandPosition);

animator.SetIKPosition(AvatarIKGoal.RightHand, rightHandPosition);

// align knees to the hand

animator.SetIKHintPosition(AvatarIKHint.LeftKnee, leftHandPosition);

animator.SetIKHintPosition(AvatarIKHint.RightKnee, rightHandPosition);

animator.SetIKHintPosition(AvatarIKHint.LeftElbow, leftElbowPosition);

animator.SetIKHintPosition(AvatarIKHint.RightElbow, rightElbowPosition);

// activate everything. Could be done on start

animator.SetIKPositionWeight(AvatarIKGoal.LeftFoot, 1.0f);

animator.SetIKRotationWeight(AvatarIKGoal.LeftFoot, 1.0f);

animator.SetIKPositionWeight(AvatarIKGoal.RightFoot, 1.0f);

animator.SetIKRotationWeight(AvatarIKGoal.RightFoot, 1.0f);

animator.SetIKPositionWeight(AvatarIKGoal.LeftHand, 1.0f);

animator.SetIKPositionWeight(AvatarIKGoal.RightHand, 1.0f);

animator.SetIKHintPositionWeight(AvatarIKHint.LeftKnee, 1.0f);

animator.SetIKHintPositionWeight(AvatarIKHint.RightKnee, 1.0f);

animator.SetIKHintPositionWeight(AvatarIKHint.RightElbow, 1.0f);

animator.SetIKHintPositionWeight(AvatarIKHint.LeftElbow, 1.0f);

}
Create your own tools
Since we are exposing the API, you will be able to create all sorts of tools to create and edit Mecanim assets. When playing with 2D, I find it useful to use Blendtrees to do my navigation state. Since it uses sprite animation, I often need to redo the same steps over and over again for my different characters. Using the API, I created a simple EditorWindow:

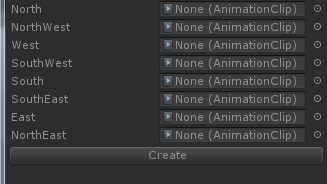
So I just need to drag in my sprite animations and the target object. Then I click create to get this:

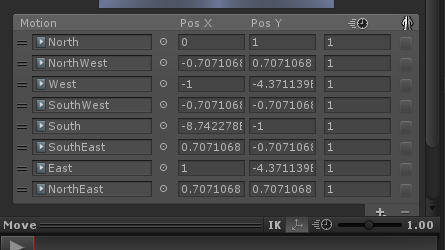
The code for the creation of the controller is as simple as it gets:
// Creates the controller</pre>
UnityEditor.Animations.AnimatorController controller = UnityEditor.Animations.AnimatorController.CreateAnimatorControllerAtPath("Assets/" + target.name + ".controller");

// Adds 2 parameters

controller.AddParameter("VelX", UnityEngine.AnimatorControllerParameterType.Float);

controller.AddParameter("VelY", UnityEngine.AnimatorControllerParameterType.Float);

// Blend Tree creation

UnityEditor.Animations.BlendTree blendTree;

controller.CreateBlendTreeInController("Move", out blendTree);

// BlendTree setup

blendTree.blendType = UnityEditor.Animations.BlendTreeType.SimpleDirectional2D;

blendTree.blendParameter = "VelX";

blendTree.blendParameterY = "VelY";

for (int i = 0; i < animCount; ++i)

{

blendTree.AddChild(clips[i], DirectionToVector(directionValues[i]));

}
StateMachines everywhere
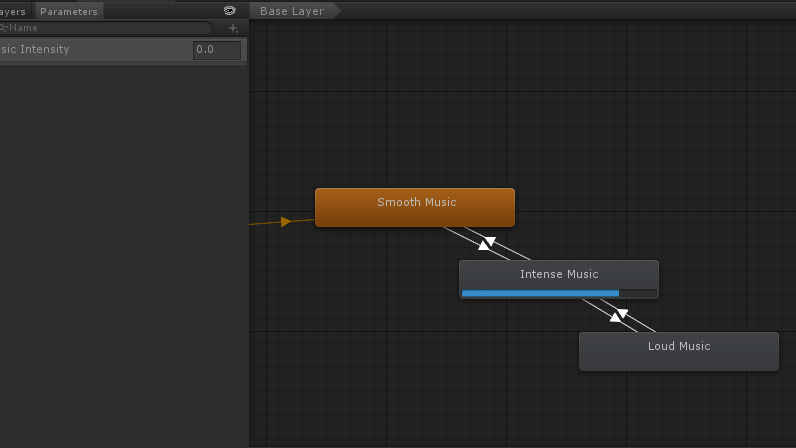
A nice thing with StateMachineBehaviours is that you can use StateMachines without animations. So anything in your game that requires some kind of StateMachine-esque logic can use our nice visual editor live feedback.
For example, a music StateMachine :

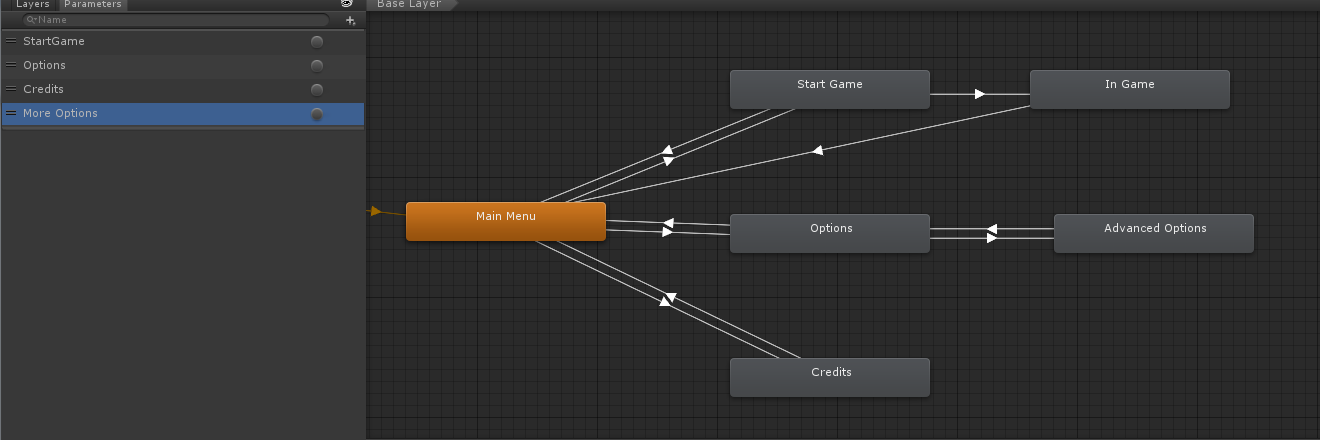
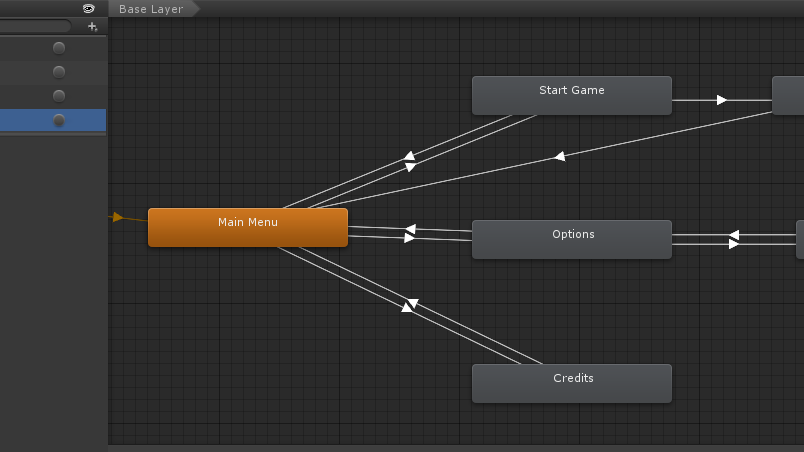
A menu StateMachine

Soon it will be your turn!
I am hoping that these new features are getting you excited. We can’t wait to see what you guys will come up with!
Is this article helpful for you?
Thank you for your feedback!
- Unity Labs
- Copyright © 2024 Unity Technologies